A PPM Masterclass – Part 1: The Basics
Although many people disagree with the extra “P” in PPM (I’ll leave the argument about whether all planned maintenance is necessarily preventative to the philosophers!), the main difference between PPM and repair jobs are that with planned maintenance you decide what work to do, and when to do it, while with repair jobs it is the equipment which decides when and how it is going to break!
What is a PPM Schedule?
The term schedule when applied to planned maintenance can be confusing. To some it means the list of equipment which will be serviced in a given period, to others it describes a maintenance regime. E-Quip uses the latter. As an example let’s look at how you might schedule planned maintenance for your car.
Every 500 Miles: Check engine oil, check engine coolant, check type pressures, check windscreen washer fluid, check brake fluid level, check lights, …
Every 20,000 Miles: Change the engine oil, change air filter, lubricate suspension, check wiper blades, re-gas air-conditioning, change pollen filter, …
In E-Quip these are what we call PPM Schedules. They are made up of:
A frequency (500 miles, 20,000 miles). This specifies the maintenance period.
A set of instructions that describe what to do.
A significant proportion of medical devices are maintained on 12-monthly schedules. Cycles (e.g. miles) are common for cars but most medical devices have calendar-based maintenance frequencies. If you were running a fleet of cars then any number of your cars could be maintained according to one or both of these schedules. That’s the 3rd important feature of a schedule:
The list of items that it applies to.
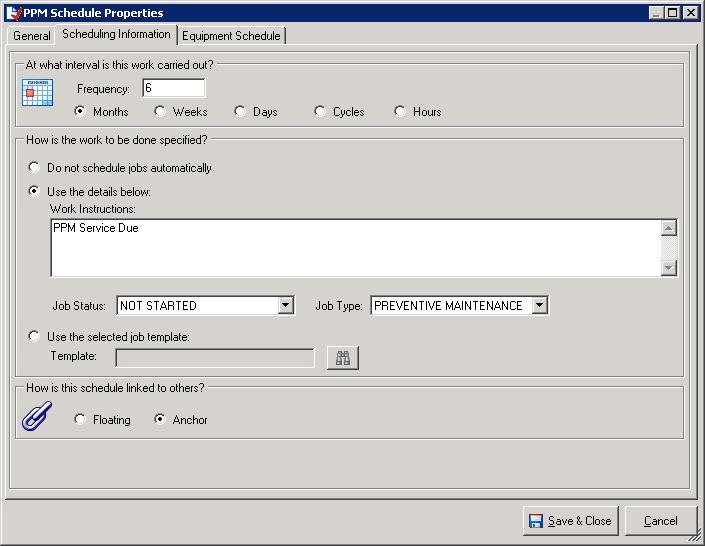
On the screen-shot below you can see that the 1st section of the screen identifies the frequency that the work should be carried out and the 2nd section has 3 different ways of saying what work should be done. More on this later.
The last section of the schedule has 2 options, Floating and Anchored. Suppose that your car is overdue its 20,000 mile service (your actual mileage is 22,000). Once the 20,000 mile service is done when should the next be due, at 40,000 (anchored) or 42,000 miles (floating)? If an infusion pump is due an annual service on 1st June but it is not done until 15th August, when should the next annual service be due, 1st June next year (anchored) or 15th August next year (floating)? Whether to use floating or anchored schedules will depend on the nature of the work done and also on your management strategy.
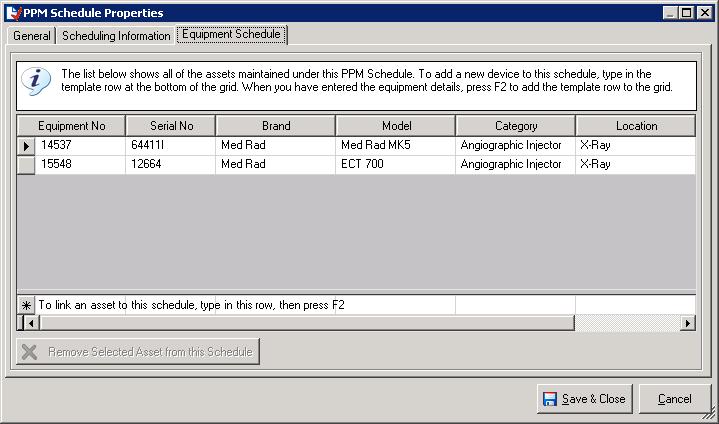
The next screen-shot shows the other important part of a PPM Schedule: the list of equipment which is maintained according to that schedule.
Saying what you should do to your car every 500 miles is one thing – doing it is another. Just because a device is on a schedule does not mean that any work has actually been either planned or carried out. In E-Quip, work is always recorded in a job. The purpose of the PPM Schedule is to inform the system how and when to create those jobs.
Adding a Device to a Schedule (and vice-versa)
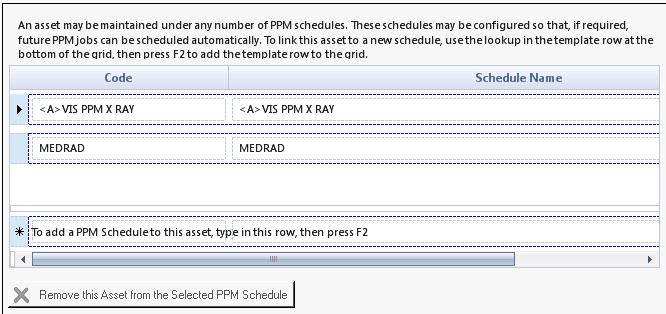
There are many ways that a device can be added to a schedule. In the screen above, for example, you can just enter an equipment number in the botton of the grid and press Enter, it’s as simple as that. Alternatively you could open the asset property page, go to the PPM Schedule tab, type the PPM Schedule name in the botton of the grid and press Enter.
Both of those methods are fine if you’re adding 1 or 2 devices to a schedule, or adding 1 or 2 schedules to a single device, but what if you want to add 500 assets to a PPM Schedule; you certainly wouldn’t want to type 500 equipment numbers. Suppose you need to add all of your MS26 Daily Rate Syringe Drivers to a particular schedule.
1. On the equipment summary screen set a filter to find all active MS26
2. Select all of the records in the grid (Ctrl+A)
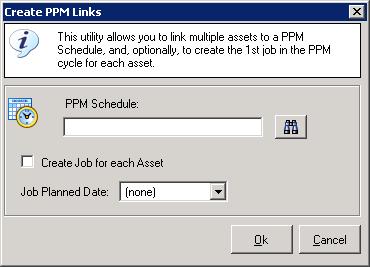
3. Right-click the mouse in the grid and choose the “Add the Selected Assets to a PPM Schedule” menu. The dialog box below will appear.
4. Choose the PPM Schedule from the lookup.
5. If you don’t tick the box marked “Create Job for each Asset” and just click Ok, then every one of the selected assets will be linked to the PPM Schedule.
Creating PPM Jobs
I said earlier that while linking a device to a schedule is making a statement about how you intend to maintain that device, by itself it does not create any jobs which will actually cause the work to be done. This is another confusion with the term Schedule, which some people use to mean the process of creating PPM jobs.
When you register with your dentist you are presumably signalling your intention to make 2 PPM visits for your teeth per year. Registration, however, is not the same thing as making your first appointment. Without that first appointment your registration is fairly pointless. However, once you have made your first appointment, from then on the whole scheduling process becomes automatic. When you attend that appointment the dentist will automatically make your next appointment. It is the act of keeping an appointment which automatically generates the next, in a completly automatic way.
The same is true with PPM Schedules : once you have made the first job for a device for a particular schedule, future PPM scheduling is completely automatic. The act of completing a scheduled PPM job automatically generates the next. Now you can see what the PPM Schedule is for. Remember, the key parts of a PPM Schedule are a frequency and a set of work instructions. When you complete a scheduled PPM job the system uses the information in the schedule to create the next job.
if we now revisit the previous example, in Step 5 I deliberately left the check-box “Create Job for each Asset” unticked, as my intention was simply to link all of the MS26’s to a schedule. In practice it is far more likely that I would have ticked this box, in which case, not only would every active MS26 (which was my equipment filter) have been linked to the selected schedule, but a job would have been created for each device. From then on, PPM scheduling will be completely automatic for all MS26’s.
What Happens When a Scheduled PPM Job is Completed?
The built-in PPM post-processing is very simple, and yet very powerful. The first thing to clarify is exactly what a scheduled PPM job is. Any job which has a job type class of “PPM” is a PPM job, but only PPM jobs which have a value in the PPM Schedule field on the Work Done tab are scheduled PPM jobs. Not surprisingly, the PPM Schedule is central to PPM scheduling!
These are the actions that the system takes whenever a PPM job is saved:
1. If there is a value in the PPM Schedule field on the Work Done tab, and this device is not already linked to the specified schedule, then the asset is linked to the schedule.
2. If the job status class is “Completed” then the Last PPM Date field on the equipment record is updated with the current date and time.
2a. The frequency is read from the schedule along with the anchored/floating indicator. This is used to calculate the next due date for this asset on this schedule. If this date is before the current value of the Next PPM Date field in the equipment record, then the equipment record Next PPM Date field will be updated.
2b. If an unfinished job does not already exist for this schedule and asset, and if the specified PPM Schedule is not marked “Do not Schedule Jobs Automatically”, then a new scheduled job will be created for this asset/schedule.
The really important thing to realise is that this processing happens every time a job is saved – it doesn’t matter how the job was created. You might have created it manually, you might have created it by selecting the “Add the Selected Assets to a PPM Schedule” menu, or it may have been created by completing an earlier PPM job; it really makes no difference. It also doesn’t make any difference how you are saving the job. You can be updating a job from the job screen or from the service history tab of the asset screen, or you might be bulk updating a number of jobs. The PPM post-processing is always the same.
Before continuing I would strongly recommend that you try this very simple experiment:
1. Create a simple anchored PPM Schedule called TEST, which has a frequency of 6 months. (see below)
2. Create a test asset
3. From the asset property page, go to the Service History tab and create a new job.
4. Set the following job fields: Status = Completed, Type = PPM and PPM Schedule = TEST
6. Notice that a new job is automatically created for the next PPM job.
7. Notice also that the asset has been linked to the schedule and the Last and Next PPM date fields have been updated.
8. If you’re still not sure how the PPM post-processing works, complete the outstanding PPM job and see what happens.
That’s all for now. The next article in this series will delve into PPM scheduling in more detail.
