Several of our non-NHS customers run each hospital that they manage as separate, almost self-contained contracts. Like most of our users they make use of budgets to keep track of costs, although they tend not to use them in the same way as the NHS; they are unlikely to have Cost Centres and Subjectives. Within the NHS, when spare parts are consumed by jobs there are many ways that costs can be assigned. One common way is to assign a budget when adding the part to the job but there are many other ways this can be handled. For example, the Cost Centre budget might be derived from the equipment location or service and the Subjective might be set manually on the job screen.
This works well for the NHS but imagine a scenario where an organisation has a central purchasing division which buys spare parts for the whole company. Stock for a spare part might be held at each hospital, so there could be a large number of spare part locations for each part. This allows the organisation to use the Footprint Manager so that engineers at one hospital would only see the stock held in their own stores. These organisations can track part costs as they are consumed in the same way as the NHS, by assigning a budget when a part is used. However, there is a limitation here in that part costs can only be easily monitored when they are consumed – the value of stock is not quite so easy to track. It is possible, it’s just not quite so simple. It also relies on engineers selecting the correct budget when adding parts to a job.
These difficulties arise because e-Quip does not assign budgets to spare part locations. This has been addressed in version 4.3.0, with two budgets being added to stock locations. We added two so that the NHS could use them as Cost Centre and Subjectives, but their labels are “Budget 1” and “Budget 2“. Why didn’t we call them Cost Centre and Subjective? This is where we get tangled up with history, how systems evolve and how people use the system that they have.
Historical Note: Many years ago we did a data migration from a system which supported a budget for stock locations. The users wanted to implement Cost Centre and Subjectives, but because of differences in terminology, didn’t realise that what they referred to as the “cost centre” was indeed what that budget represented in that system. That system also supported user-defined fields, and so they created their own “Cost Centre” field. When they switched to e-Quip it was important to them to retain this information, but e-Quip didn’t have this feature. So, we very obligingly added it for them, but we didn’t add it as a budget because they weren’t using budgets (still with me?). No other customers have ever needed or asked for this and so it has sat there, probably unused, ever since it was added. It’s very likely that even the customer who originally asked for this feature never actually made use of it. After all, budgets are most often assigned to parts when they are used, not when they are in storage. So, eventually we come full circle and somebody does eventually have a need for this. While we would have liked to have called them Cost Centre and Subjective, just to fit in with how budgets are used elsewhere in the system, one of those names was already taken! If we had called one of the budgets “Subjective” then users would naturally thing that this was meant to go with the (existing) cost centre field. That isn’t a budget lookup, so that would have caused even more confusion. In the end, we decided on “Budget 1” and “Budget 2“.
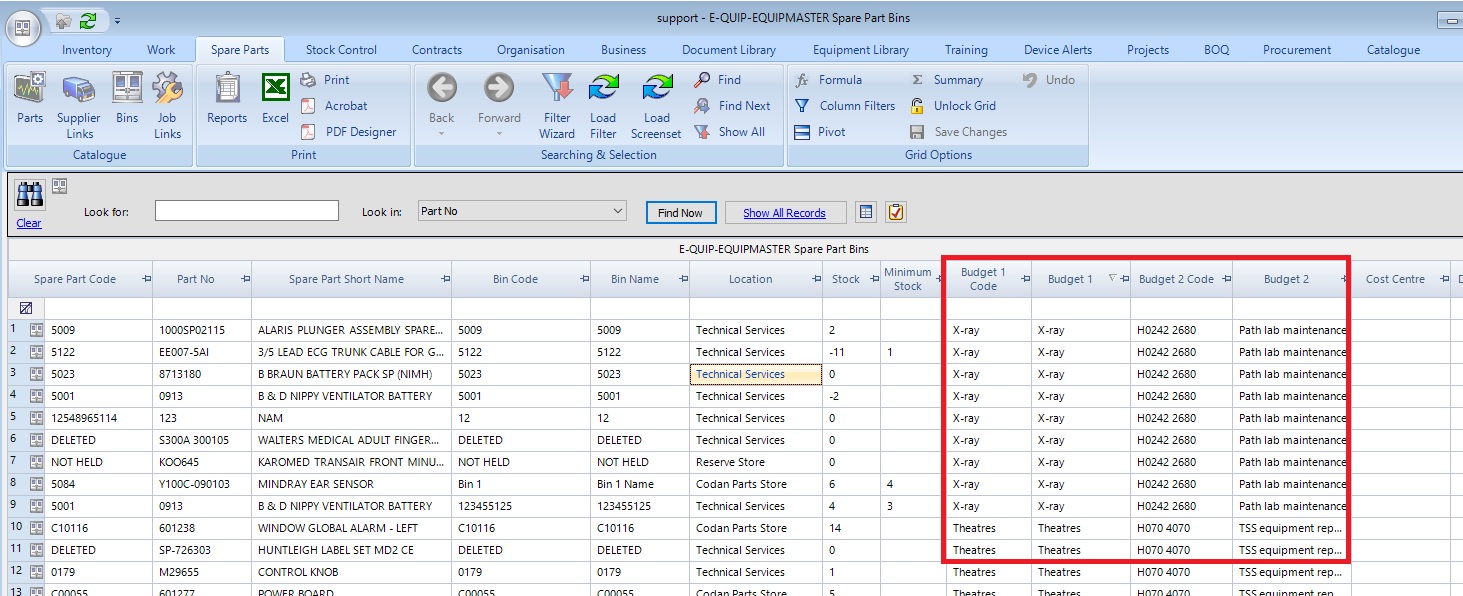
Notice the “Old” Cost Centre column on the Right
How do you set these new budgets? In exactly the same way that you set any stock location attributes. On the locations sub-list of the spare part property page.
Now that spare part locations have budgets, there are more choices available when adding a part to a job. Previously, the budget had to be set manually, now it is copied from the spare part location, if it is associated with a budget. However, when adding a spare part to a job there is only one budget column in the spare parts sub-list. This is because only one budget is needed here. Within the NHS the Cost Centre (which is a budget) would normally be derived from either from the location or service of the asset. The budget on the job’s spare parts sub-list is there for the subjective budget.
Which budget is chosen from the stock location? If there are two, then the first is used, but if the first is empty and the second isn’t, then that will be used. If you have associated two budgets with your stock locations and want the second to be used by the job, then get in touch and we’ll change this.
So, now we have budgets for spare part locations and they can be automatically copied to jobs when parts are used. What else do we need? Let’s go back to our earlier example of a large organisation which has a central purchasing division which buys spare parts for the whole company. Stock for a spare part is held at each hospital, and budgets for these locations are set as appropriate. Suppose that the company purchase 500 batteries which arrive at the central stores and these then need to be distributed to a large number of hospitals. Not only must the stock be moved but the budgets will need to be adjusted to match the hospital that the parts have been transferred to. It would be possible to do this using manual stock adjustments but it would be very time-consuming.
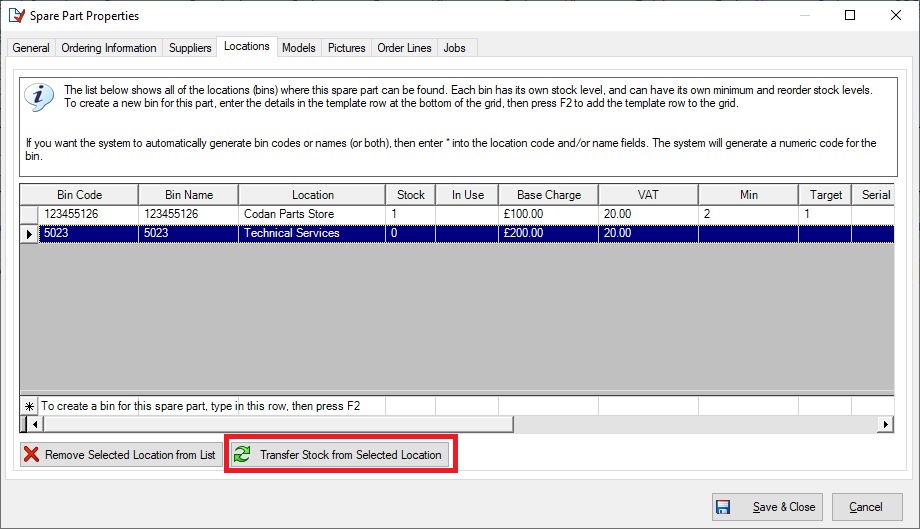
This is why we have introduced a new Stock Transfer utility. You can access it from the spare parts property page. Just select the location that you want to transfer parts from and click the new “Transfer Stock from Selected Location” button, which you can see below.
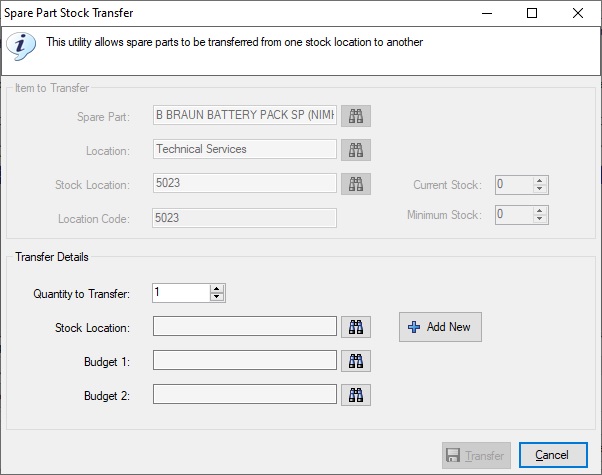
This will display the Stock Transfer utility. You will be warned if the stock level of that location is low.
The basic idea is straightforward, select the bin that you want to transfer the stock to, choose the quantity to transfer and, optionally, choose one or two budgets for the target bin. Once you’ve done that, just click the “Transfer” button and the stock will be taken from the source location and added to the target.
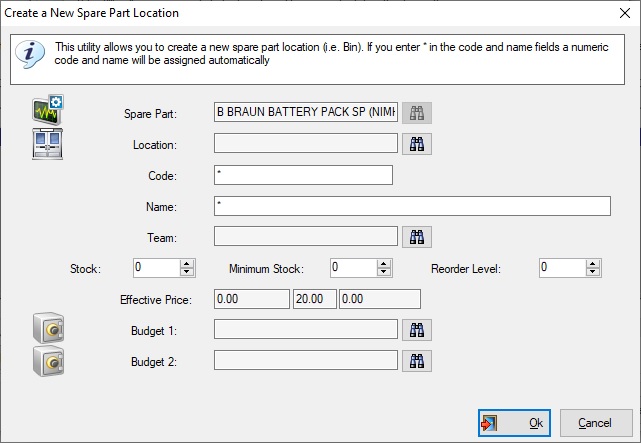
What if the target bin doesn’t exist yet? Just click the “Add New” button to create a new one.
There are a few things to notice here. Firstly, you can leave an “*” character in the Code and Name fields, just like you can on the locations sub-list on the spare part property page. This forces e-Quip to automatically generate numeric values for either the code, name, or both.
Secondly, resist the temptation to enter the quantity that you are transferring in the “Stock” field. If you do, you’ll end up with twice as much stock as you were expecting! If this is a new bin then you should leave the stock at zero. Only enter a value if this is a bin which exists in practice but which has never been added to e-Quip.
Add the other values just as you would if you were manually creating a new bin from spare part property page. It doesn’t matter whether you enter the budgets on this screen or on the stock transfer screen (which is where you’ll go back to once you click “Ok“). If you were using this utility as a convenient way of creating bins, rather than typing in the locations sub-list, then you could enter the budgets here.
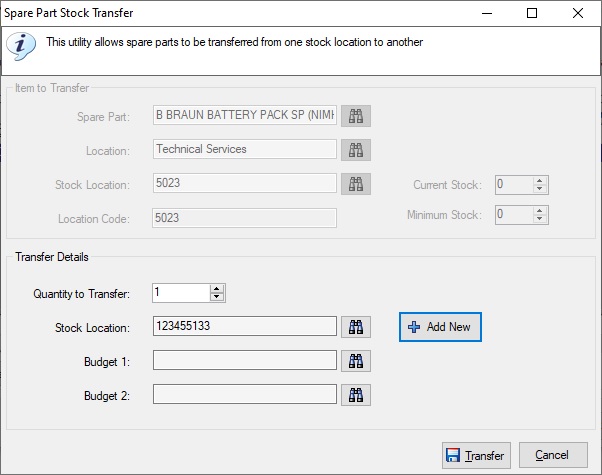
Click Ok to create the new bin. This will take you back to the Stock Transfer utility. Notice that the bin you created will have been selected as the target.
If you are transferring stock to an existing bin (i.e. you didn’t click “Add New” to create one), then you should enter the new budgets if appropriate.
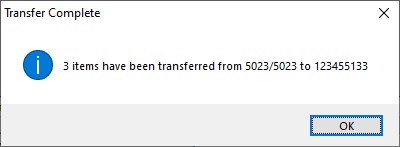
Now click the “Transfer” button. You may receive various warnings at this point. This would happen if the source location has no stock or the transfer would take its stock level to zero or below its minimum stock level. If you do see warnings you are still able to continue with the transfer. If there are no errors then when the transfer is complete you will see a confirmation message.
The sub-list will then refresh to show the new location, and that’s it.
All stock changes made by this new utility are audited, just as any other stock movements are. They can be viewed on the Spare Part Audit summary screen. Note that a new Spare Part Audit Event class of “Stock Transfer” has been added. Before using the utility you should create a Spare Part Audit Event (using the Reference Data utility) set to this class.
We hope you find this useful. As always, any feedback will be more than welcome.
