You may have come across the series of articles about configuring e-Quip using the Role Manager. This is a really big subject and even when tackled in small chunks the articles are tending to become long which might give the impression that this is more complex than it actually is. For that reason we have moved some of the discussions about groups and permissions, along with the Footprint Manager, into separate posts.
In order to use e-Quip you must have a user account and that account will belong to a single group. Essentially a group defines your permissions or rights. i.e. what you are allowed to do within e-Quip. Almost always a group will have multiple members (i.e. user accounts) but remember, a user account is a member of a single group.
Item Permission Masks
Every data item in e-Quip is protected by a permissions mask which can be any combination of:
Read – This data can be seen
Write – This data can be edited
Add – New records can be created
Delete – Records can be deleted
Control – This grants the read, write, add & delete permissions and also allows records to be archived
Is the term data item the same as saying screen? For example, do permissions on the Location data type just refer to the location screen? No – these permissions apply across the whole of e-Quip. If a group has Add rights on locations, for example, then not only will the Create New Location menu on location screen be enabled, but the Add New button on the location Lookup control will be enabled everywhere it occurs, even in places like the QBE (Query by Example) utility.
Why is it called a mask? This is a bit of IT terminology used to describe something where the overall effect is defined by adding individual items, often called flags. Suppose that the read flag was represented by the number 1, write by 2, add by 4 and delete by 8. Using these flags, the mask 15 represents: 1 + 2 + 4 + 8. Thus 15 = read + write + add + delete. They are held this way (as ascending powers of 2) because computers can compare such masks very quickly.
Setting Permissions
The User Manager is responsible for defining the permissions associated with a group. To run this utility, click the Office menu (the round menu button in the top left-hand corner) on the dashboard screen and select Manage Users.
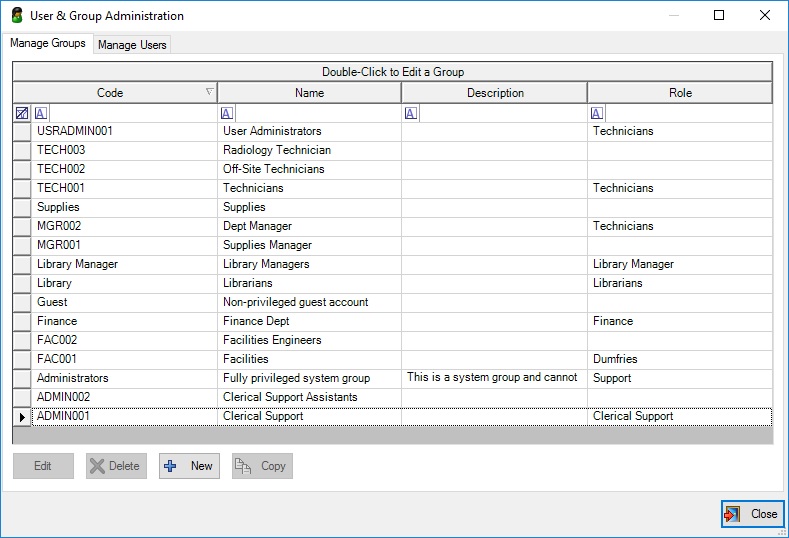
A screen will appear with two tabs, one to manage groups and another to manage individual users.
Group creation is trivial: simply click the New button and enter a code, name & description for the group. The code is largely unimportant and is used sometimes for advanced system customisations.
To open or edit a group, simply double-click on it in the grid. When a group is displayed, click the Permissions tab to see the rights mask for every data type.
Editing permissions is as easy as you would think; simply tick the boxes for the rights that you want to set. You can set the rights for multiple data types by selecting them in the list and then clickign Edit Selection. This will display the following screen:
Just tick the appropriate rights then click the Apply button and those rights will be applied to every selected data type.
Delete Rights
When is it appropriate to delete a record from a database? I would start from “never” and then argue back very vociferously from there! My personal view is that if you create a job by mistake, then you should just set its status to Cancelled, not delete it, but that’s just my personal view. Incidentally, it isn’t possible in e-Quip to delete something that is referenced by something else.
Links Between Entity Types
Let’s suppose that a group has write & add permissions on jobs, so they can create new and edit existing jobs. What happens if those users need to a) add parts to a job and b) remove parts from a job that they may have added accidentally.
There are three separate data types involved here:
Jobs
Spare Parts
Part / Job Links
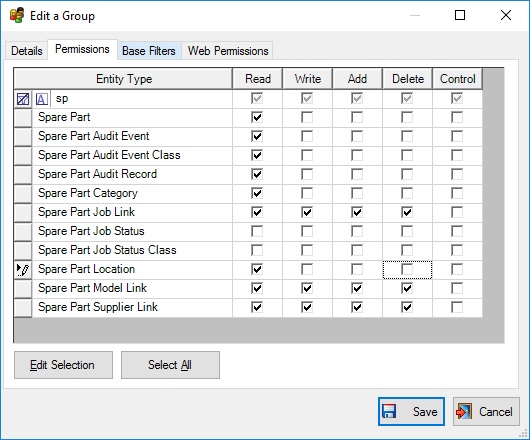
You can’t add parts to a job unless you can actually edit jobs in the first place. You cannot select from a list of spare parts if you don’t have at least read access to spare parts. But, to add a spare part to a job you also need write access to the Spare Part / Job Link entity. These are three distinct permissions. You might not be able to add new jobs, or create new spare parts, but you can still add spare parts to a job. There are separate rights masks for all three. have a look at the permissions below:
This group can see (i.e. read) spare parts but has read + write + add + delete rights to spare part job links, spare part model links and spare part supplier links.
This means that these users can:
Add a spare part to a job (“this spare part was used on this job”)
Add a spare part to a model (“this spare part is applicable to this model”)
Add a spare part to a supplier (“this spare part can be purchased from this supplier”)
It should be reasonably obvious that adding (i.e. creating) a spare part is not the same as linking an existing spare part to a job, model or supplier.
Deleting Links
Notice that this group has permission to delete spare part links. This is not the same as being able to delete spare parts. If a user adds a part by mistake to a job then they need to be able to remove the spare part from the job. Similarly, if a supplier stops selling a particular part, removing it from the supplier is not the same as deleting the spare part itself. It will almost always be the case that if a group has the rights to add a link then they will also be able to delete that link.
Footprints
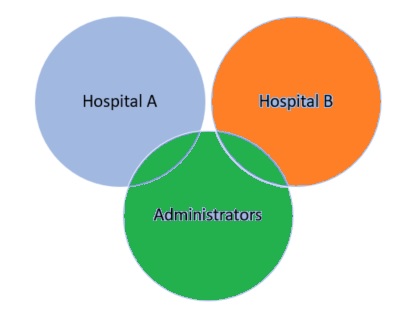
Although groups primarily exist as a permissions mechanism, each group also has a Footprint, which defines the data which is visible to that group. If you’ve ever seen a Venn diagram then you’ll have a good idea what this means.
The “Hospital A” group can maybe just see their own data, and likewise the “Hospital B” group might be only able to see theirs, but an administrator would be able to see data across both sites. This is not the same as a permission: all three groups have read access to equipment (for example); the footprint defines the data that they can actually see.
This blog article explains how the Footprint Manager operates.


