The combined new functionality in versions 3.8 and 3.9 is so considerable, especially when taking versions 3.1 through to 3.7 into account, that the latest update is being shipped as a major release: 4.0.
Our latest build brings a lot of new features to the party, including:
- Maintenance Profiles
- System PPMs
- Capital Bidding
- Job Locking
- Improved Security
When you add this to earlier enhancements, such as the interactive graphical dashboard, automated email processing (SMTP, IMAP & POP3), model-based training competence policies, version 4.0 represents a considerable step up from version 3.0.
Job Record Locking
The job screen now supports explicit pessimistic locking at record level in order to prevent simultaneous edits being made to a job. Until now edits to jobs were isolated at tab level. i.e. one user editing one tab would have no impact on another user simultaneously editing a different tab for the same job. The model of pessimistic locking is based on the rather pessimistic assumption (hence the name!) that multiple users will attempt to edit a job at the same time. In practice this is probably relatively rare.
As soon as the user signals their intention to edit a job (by clicking the Unlock button) the system attempts to lock the record so that no other user can do the same. Almost always the lock request will succeed and the requesting user is granted exclusive access to the job. If another user attempts to edit the job while it is locked, their lock request will fail and they will see this message:
When the user who owns a job lock either saves their changes or cancels their edit, the lock is released so that other users may then edit the job.
Pessimistic locking is relatively simple to implement but it has some drawbacks:
- A user may gain a lock and then disappear on an extended holiday!
- A user may lock a job and then close down e-Quip in an uncontrolled way (e.g. Ctrl+Alt+Del or using the Windows Task Manager)
- The user’s computer might crash while the user owns a lock
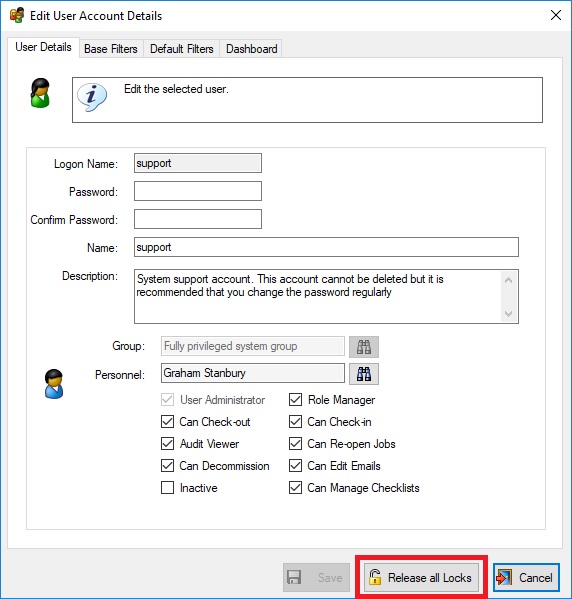
When this happens the system administrator needs a way of releasing any locks owned by the user. This is done from the User Manager screen:
Capital Bidding
Several new screens have been added to support the equipment bidding process. Essentially this is the process which starts with someone requesting the purchase of a medical device and ends with the commissioning of whatever is purchased. The term may be somewhat of a misnomer since there is no real need for the request to relate to a capital purchase. The word “bid” here is meant in its non-commercial meaning, “to attempt” rather than “to offer“, although that interpretation does help to capture the notion that this is often a competitive process. There may be many requests for equipment purchases but without unlimited funding not all of those requests will necessarily be satisfied.
The new functionality comprises:
- Capital Bidding Projects
- Capital Bidding Project Bids
A capital project is a container for related requests:
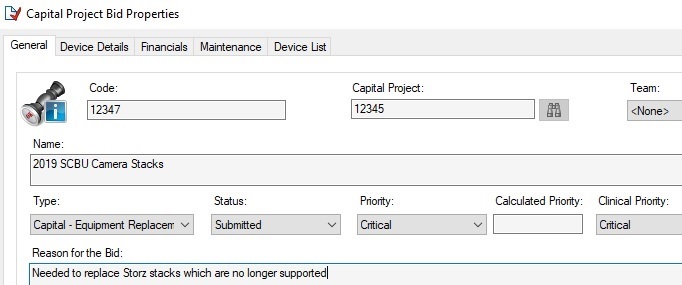
Each request is referred to as a bid:
Once bids have been considered and approved, commission and decommission requests can be created automatically from them.
Have a look at this blog article to see a detailed description of the capital bidding process.
As soon as we get feedback from the user community to confirm that our new model is correct for the majority of users, then a web interface will be added to support the creation and submission of bids.
System PPM Utility
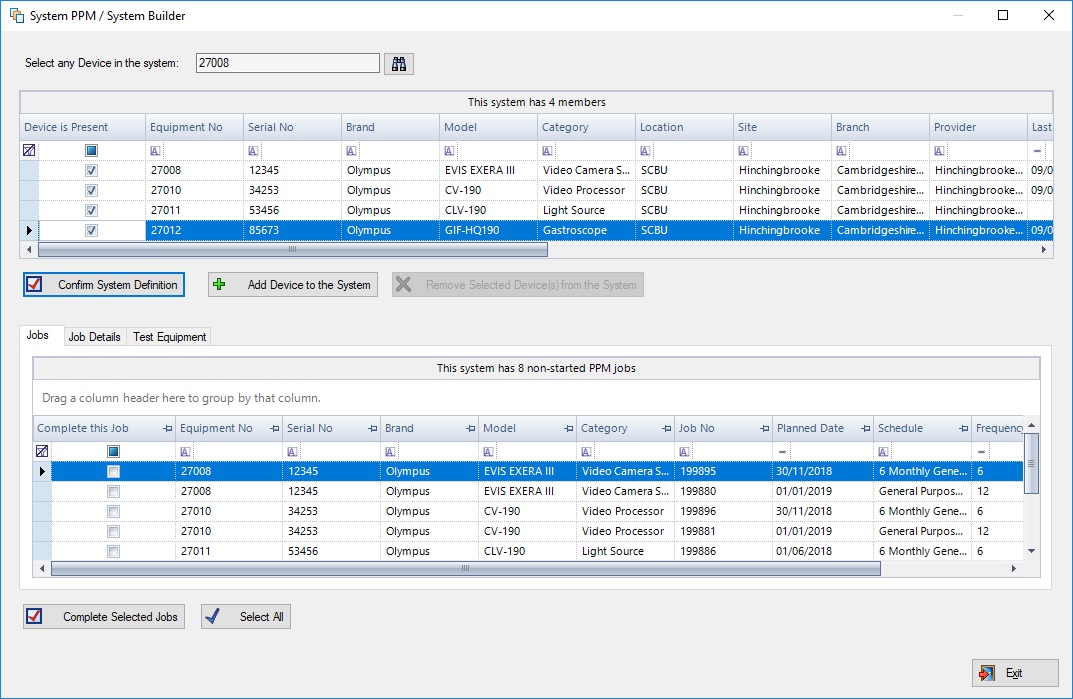
In e-Quip, systems are assemblies of equipment linked in a parent/child hierarchy. They are commonly used when some clinical functionality is implemented by a number of discrete devices, each of which are recorded individually as part of the inventory. A camera stack is a common example, where the system may comprise an endoscope, light source, camera, image processor, insufflator etc. Individual components are sometimes referred to as modules. See this blog article for more information. Because each device has its own inventory record, planned maintenance of a system will involve the completion of multiple jobs which increases the administrative workload for engineers.
The process is made more difficult because device users frequently exchange modules between systems for operational reasons, which means that what the engineer actually finds may be different to the inventory definition. This may involve redefining the system before starting work and may even involve changes to work which was going to be done. For example an engineer might set out with the intention of performing a minor service on a camera stack only to find that the light source has been swapped for one which is due its major service.
The System PPM utility is designed to simplify this quite complex process.
Because the System PPM utility can be used to define or redefine the modules within a system, it is also sometimes referred to as the System Builder.
Have a look at this blog article to see a detailed description of the System PPM utility.
Maintenance Profiles
A maintenance profile is a collection of PPM schedules that can be applied to devices as a group. For example, a device might be serviced every 3, 6, 12, 24 & 60 months. Rather than having to add the device to 5 separate schedules it can be assigned directly to the profile.
Suppose that we have an anaesthetics machine which is maintained under multiple schedules. This can be described using a maintenance profile as follows:
The profile itself:
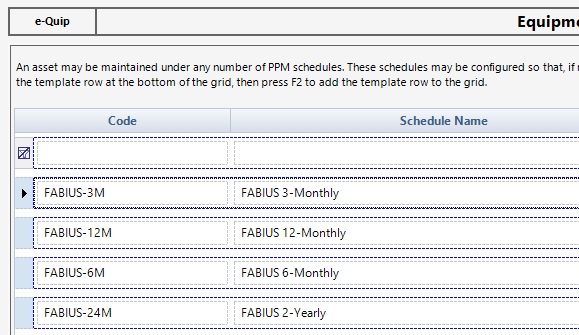
The associated schedules:
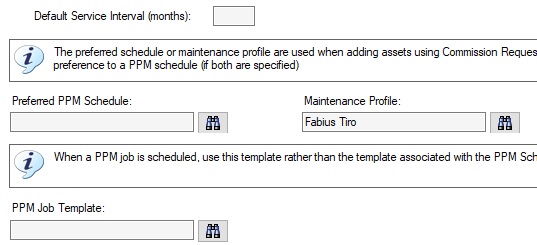
Just as it is possible to associate a model with a PPM schedule, so it can also be linked to a profile. Here is an extract from the Fabius Tiro model, which shows the link to the profile above:
The maintenance profile is most useful when devices are initially commissioned and so the commission request has been modified to make use of it. This release sees significant enhancements to the commission request screen. Rather than duplicating that information here, have a look at the next section to see how maintenance profiles fit in with the new improvements.
Commission Requests
There have been so many improvements to this screen that it is difficult to know where to begin. Let’s start with the simple changes before looking at the PPM-related enhancements.
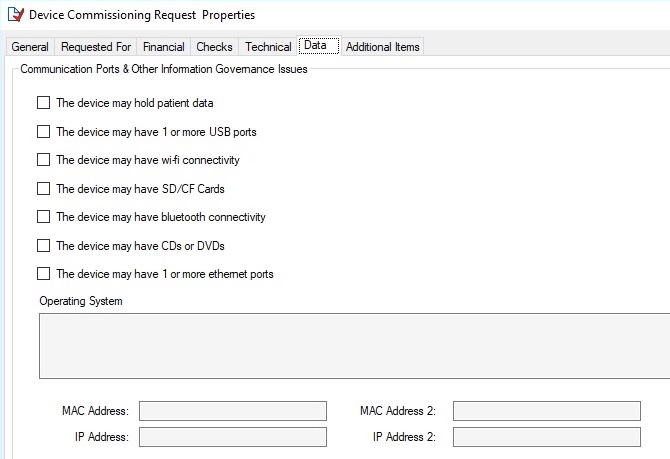
Firstly, a new tab has been added to hold data and information governance details.
Naturally, all of this information is copied to the new equipment record(s).
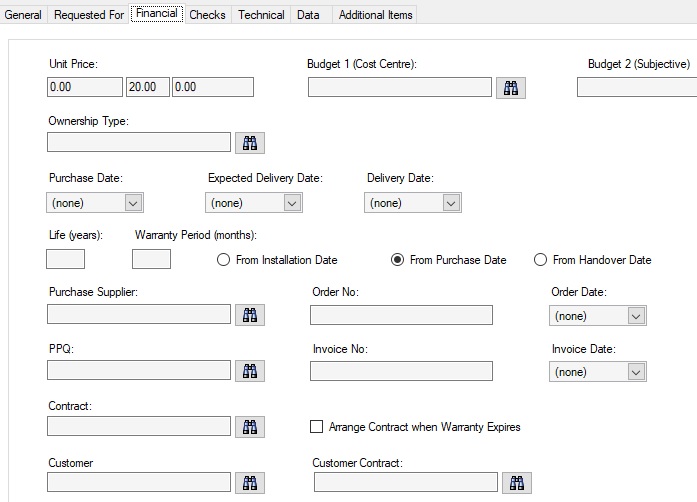
There have also been some changes to the Financial tab:
Some new fields have been added:
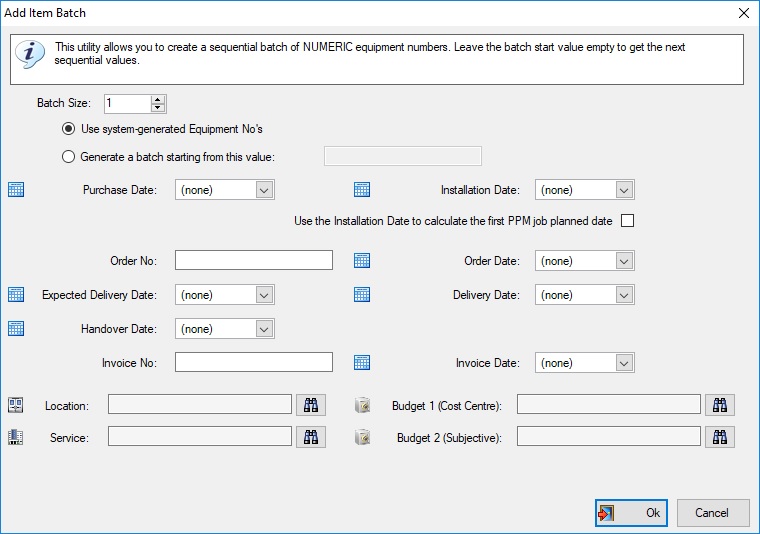
- Budget 1 (Cost Centre)
- Budget 2 (Subjective)
- Expected Delivery Date
- Delivery Date
- Order Date
- Invoice No
- Invoice Date
Also, the Purchase Price field has been relabelled Unit Price to make this consistent with the equipment screen.
There is also a new warranty calculation mode, From Handover Date. This uses the new Handover Date field which has been added to the Technical tab.
On the Additional Items tab it is now possible to display an equipment record by double-clicking on a grid record and several new columns have been added to the grid:
- Budget 2 (Subjective)
- Expected Delivery Date
- Delivery Date
- Order Date
- Invoice No
- Invoice Date
- Handover Date
- MAC Address
- MAC Address 2
- IP Address
- IP Address 2
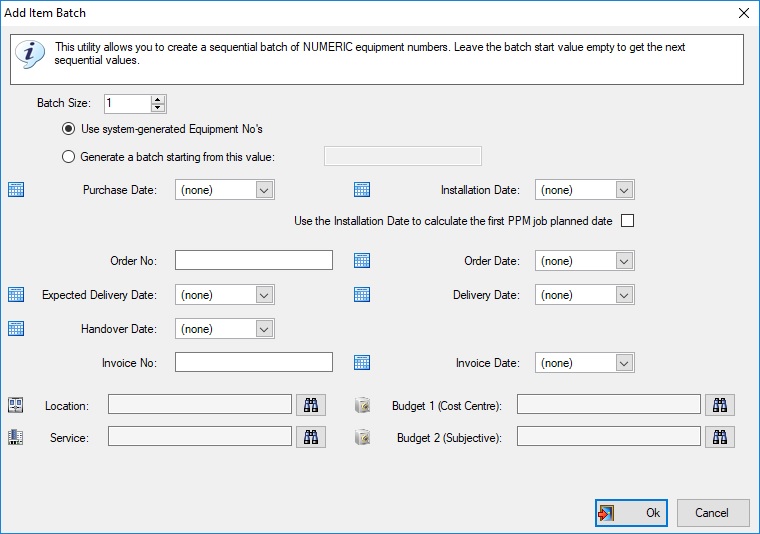
The Add Batch utility now supports these additional fields.
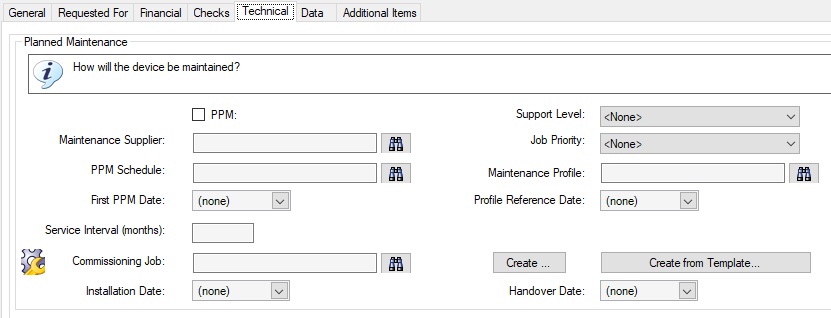
Perhaps the most interesting changes are on the Technical tab which now includes significantly-improved PPM management and support for the new maintenance profiles.
You will notice the three new fields:
- Maintenance Profile
- Profile Reference Date
- Handover Date
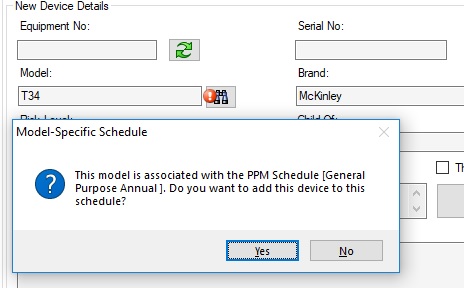
When a model is selected (on the General tab), if the model is associated with a PPM schedule then the user is asked if the new device(s) should also be linked to that schedule.
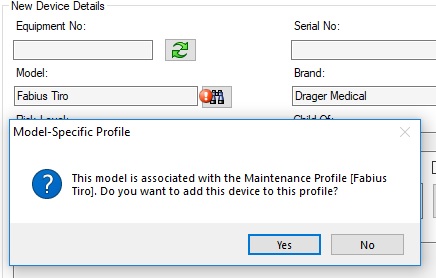
The same also applies to maintenance profiles. If the model is associated with a profile then the user is asked if the new device(s) should also be configured according to that schedule.
In either case (schedule or profile), if the user confirms this then the results can be seen on the Technical tab:
(either the PPM Schedule or Maintenance Profile fields will be set)
The First PPM Date field is not new and does not need much explanation: a single PPM job will be created for the new device (for the specified schedule) and its Planned Date will be set to this date. As you may know, you can either set this date manually, or alternatively, when entering a Purchase Date, you will be asked if you wish to use that date (with the schedule frequency added to it, naturally).
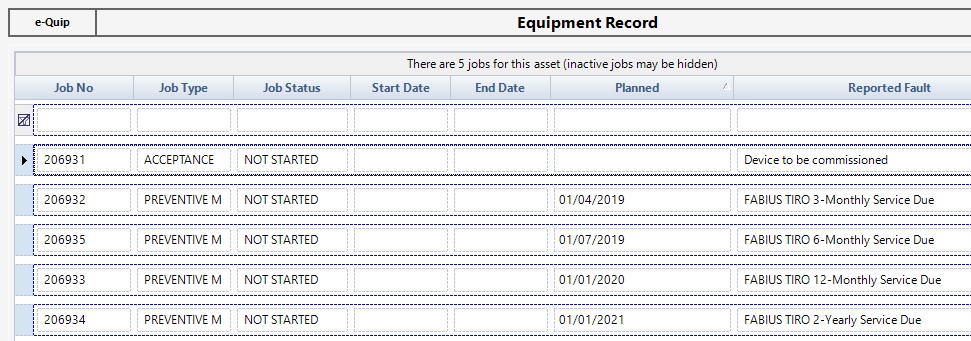
However, the Profile Reference Date is new and warrants explanation. We saw earlier that the Fabius Tiro profile comprises four separate PPM schedules: 3, 6, 12 and 24 monthly. This means that when the new device is created, four PPM jobs will be created, one for each schedule. Clearly a single date is not sufficient in this case.
Suppose that the Profile Reference Date is set to 1/1/2019. This will result in the four PPM jobs being scheduled for the following dates:
- 3-Monthly: 1/4/2019
- 6-Monthly: 1/7/2019
- 12-Monthly: 1/1/2020
- 24-Monthly: 1/1/2021
If an individual PPM schedule is used then naturally the equipment record will be linked to the schedule. However, if a maintenance profile is used then although the equipment record will be linked to each of the four schedules, there is no permanent link between the asset and the profile.
Budgets – Cost Centres & Subjective Codes
It is common within the NHS to identify costs in a way which identifies a) the entity which incurred the cost and b) the nature of the cost. These are often referred to as:
- Cost Centre
- Subjective Code
Example cost centres might be:
- 224200 – Clinical Engineering
- 224201 – Medical Equipment Library
While sample subjective codes could be:
- 7040 – Med & Surg Spare Parts
- 7041 – Med & Surg Equipment Contract
- 7020 – Med & Surg Equipment Purchase
- 7120 – Test Equipment Purchase
In e-Quip, both cost centres and subjectives are held as budgets. e-Quip has always been able to handle this and offers several alternative approaches depending on the user’s preferences. Traditionally, the “entity” which incurs costs is a department (a Service in e-Quip) or possibly a location. Very often there is a one-to-one correspondence between services and locations. Indeed, sometimes the two terms are used interchangeably. e-Quip supports this equivalence by associating a budget with a location and also by associating a service with a location. For example, the Medical Assessment Unit location might be linked to the Emergency Services service. Both of these records (location & service) have budget fields. This gives users a great deal of flexibility. Using NHS terminology, both the location budget and the service budget indicate the entity which can incur expenses, i.e. either the MAU or the Emergency Services cost centre.
The nature of an expense is frequently defined by where it occurs within e-Quip. If a budget occurs where a spare part is used on a job, then the nature of the expense is obvious. This is equally true if the budget appears on the contract screen or next to a training record.
One of the reasons that e-Quip offers so many ways of managing budgets is partly because of historical throwbacks to the legacy systems which it has replaced and also because of the way in which those systems have modelled the differences between physical, geographic entities (i.e. places) and organisational ones (services, directorates, cost centres etc). Very many older systems used to conflate the two concepts in confusing ways. Although e-Quip has always modelled these differences correctly, almost all e-Quip users start with an existing data set from an older system and inherit not only legacy data but legacy terminology and processes as well.
Recently, a number of users have requested that e-Quip should more explicitly distinguish between “who or what” is incurring an expense and the nature of that expense, i.e. cost centres and subjective codes. We have started to do this in version 4.0 and will continue over future versions. While this will be convenient for some users it will necessarily introduce an element of duplication (since e-Quip is already perfectly capable of handling this with introducing these two new terms).
Consider the example of an equipment purchase. The equipment record financial tab from an earlier version of e-Quip is shown below.
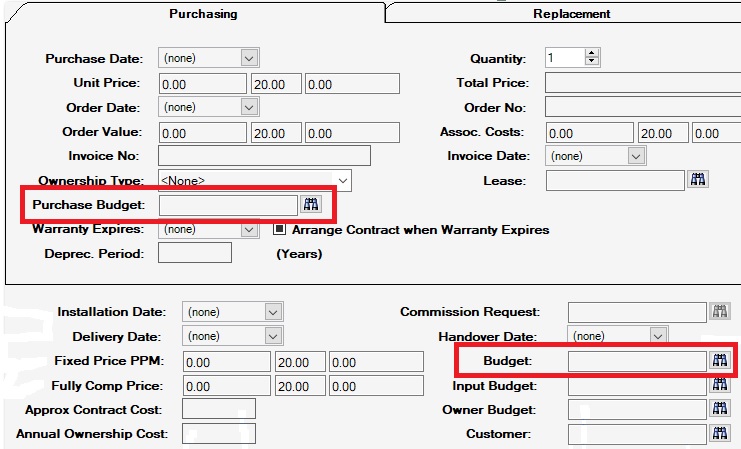
For the time-being, ignore the fields Input Budget and Owner Budget, which are rarely used and then only in very specialised situations. If the equipment is located in the Medical Assessment Unit location (which is part of the Emergency Services service), then, in previous versions, the cost centre would be either the budget associated with the location or the service, depending on local practices. The value in the Purchase Budget field would represent the subjective code. i.e. it describes the nature of the expense – the purchase of new equipment.
Look at how this is now (or can be) represented in version 4.0.
By explicitly specifying both the cost centre and subjective budgets it is now possible for the cost centre to be independent of the location of service of the equipment owner. It is also possible for either or both of these to change without affecting the cost centre and subjective budgets.
Of course, a disadvantage of this change is that it is possible to select a subjective budget for a field which either does not relate to a subjective code, or which is otherwise incorrect. For example, specifying “MAU 2018” would be incorrect in any subjective field, while entering “User Training 2018” in the Purchase Budget Subjective field would also be incorrect.
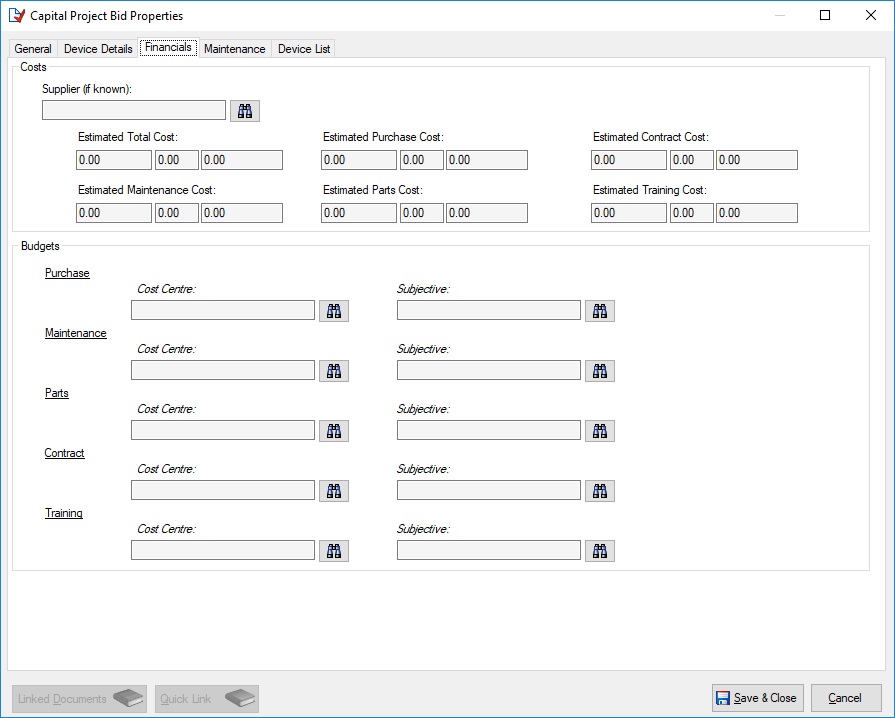
For version 4.0, additional budget fields have been added to the following screens:
- Asset (see above)
- Commission Request
- Commission Request Line Items & Add Batch
- Capital Project Bids
Equipment
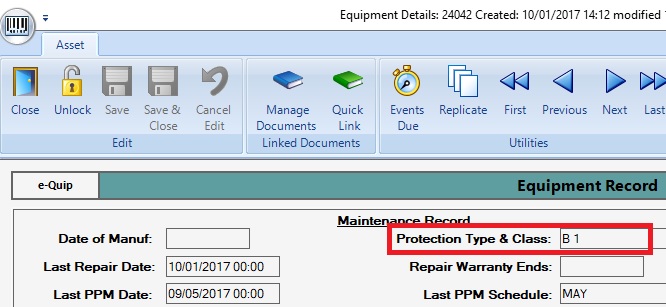
A new read-only field, Protection Type & Class, has been added to the Technical tab of the asset property page. The information is read from the model record and is a concatenation of the protection type and class fields. There has been some slight cosmetic rearrangement to make space for the new field.
The following new fields have been added to the Data tab of the asset property page:
- SD/CF Card
- Wi-Fi
- CD/DVD
- Bluetooth
- MAC Address 2
- IP Address 2
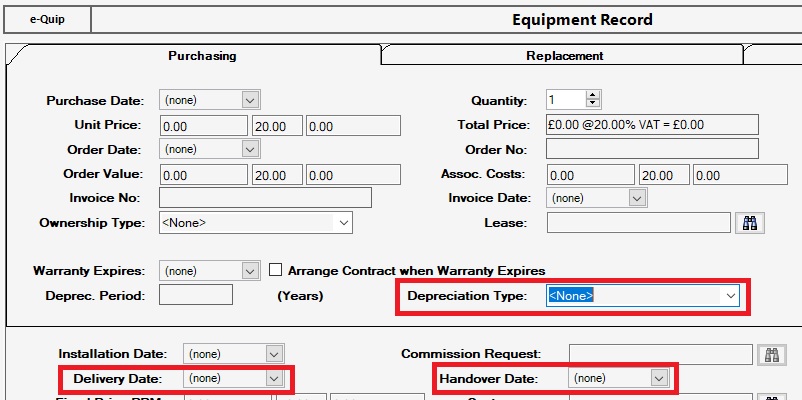
Three new fields have been added to the Financial tab of the asset property page:
- Delivery Date
- Handover Date
- Depreciation Type
Note that the Depreciation Type field is a drop-down list and this new data type has been added to the Reference Data management screen.
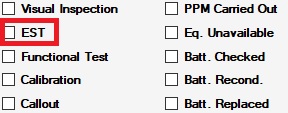
Two new read-only fields have been added to the Technical tab of the equipment property page to simplify reporting on the most recent EST/PAT and LOLER (Lifting Operations and Lifting Equipment Regulations) test dates:
- Last LOLER
- LAST EST
The addition of these fields has necessitated some cosmetic reorganisation of this screen.
These dates are calculated as follows:
Last EST: The Work Finish Date of the most recent completed job for this device which has the EST checkbox checked.
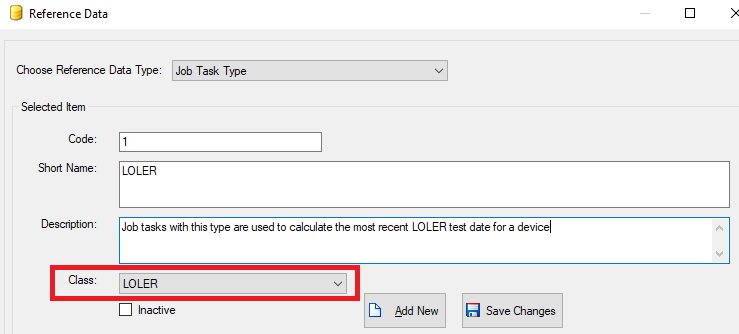
Last LOLER: The Task End Date of the most recent task with a task type class of LOLER
i.e. LOLER inspections must be recorded as tasks.
Both of these new values can be displayed on the equipment summary screen and are also searchable. However, they are not included on the equipment summary screen by default since this would impact performance for large searches. To display the values create calculated columns as follows:
The example above displays the last LOLER date. The column definition for the last EST date is similar, just use the dbo.LastESTDate() function rather than dbo.LastLOLERDate().
These same functions can be used to search for data. For example, the following equipment filter finds all devices which have had an EST since 1st Jan 2018:
dbo.LastESTDate(EquipmentId) > ‘1-JAN-2018’
These filters can have any complexity. The filter below finds all ARJO hoists which have not had a LOLER inspection for more than 6 months:
BrandShortName LIKE ‘ARJO%’ AND
CategoryShortName LIKE ‘%HOIST%’ AND
DATEDIFF(MONTH, dbo.LastLOLERDate(EquipmentId), GETDATE()) > 6
A new field has been added to the Suppliers tab of the equipment property page to identify the supplier which provides warranty services for the device.
The equipment lookup searches on this value. It is not affected by either Bulk Update or Save As.
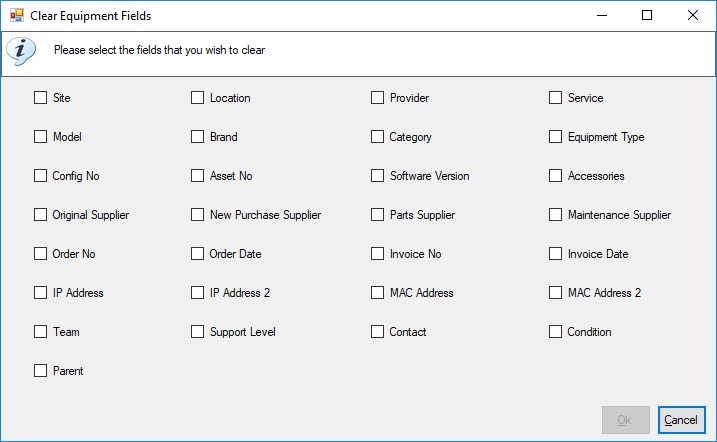
A new utility, Clear Equipment Fields, has been added to simplify the process for clearing (nullifying) certain fields. It is accessible from the context menu on the equipment summary screen when 1 or more records are selected.
Bulk update is able to nullify checkboxes but it cannot be used to clear the contents of other fields, such as text and lookups. For example, bulk update can be used to set the spare parts supplier of multiple equipment records to a specific company, but it cannot be used to set the spare parts supplier field to be empty. This is the purpose of this new utility.
Note that a similar utility has been added to the BOQ Item screen in the e-Quip procurement module.
Jobs
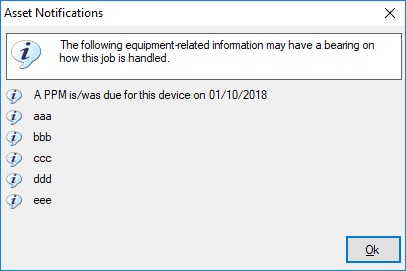
It is now possible to display user-defined warnings when opening a job.
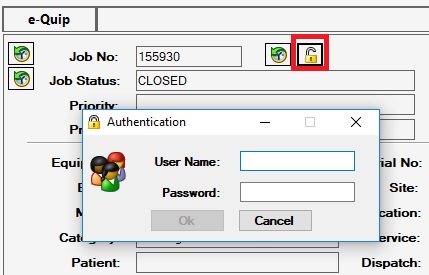
It is also now possible to re-open closed jobs directly from the job property page. In previous versions this had to be done using a separate utility.
If your user account does not have sufficient privileges to re-open jobs then you must enter the user name and password for an account with the required rights.
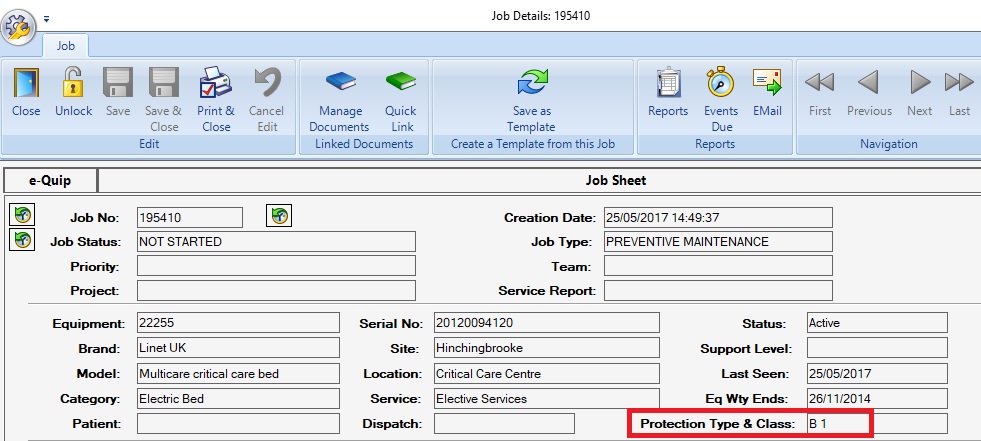
A new read-only field, Protection Type & Class, has been added to the general tab of the job property page. The information is read from the model record. There has been some slight cosmetic rearrangement to make space for the new field.
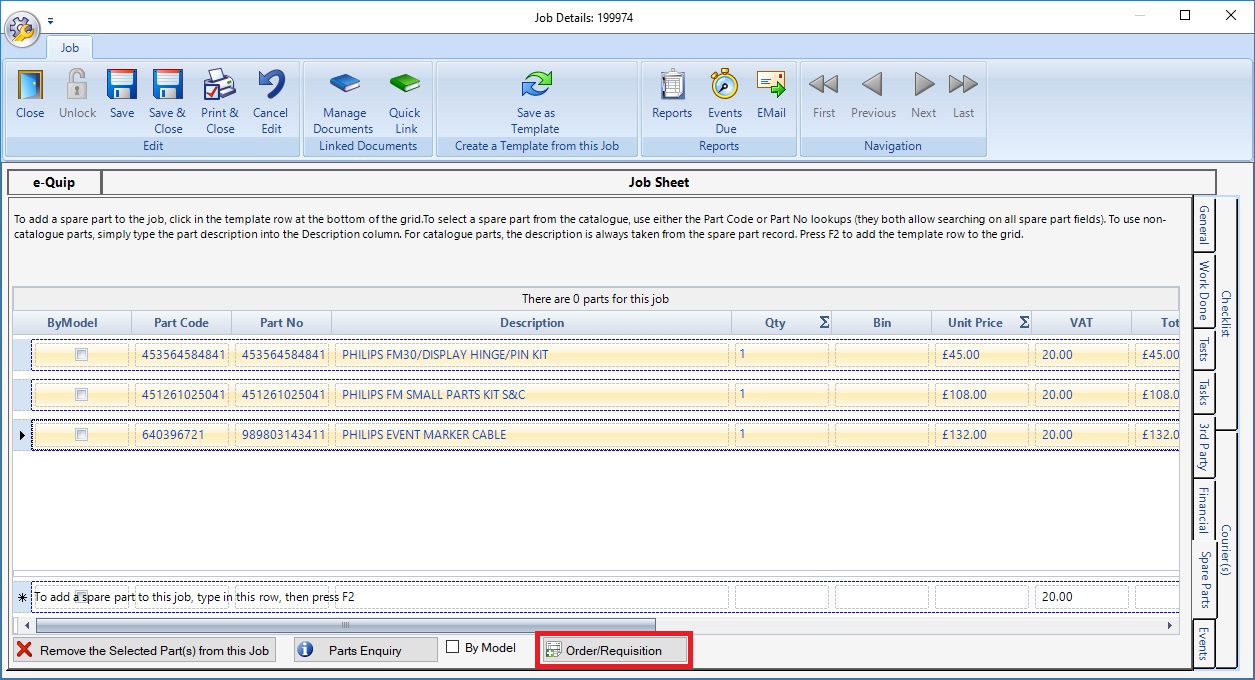
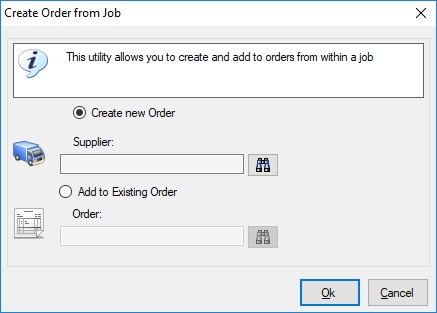
Spare parts can now be ordered directly from within a job. You can either create a new order or add the selected parts to an existing order.
In the spare parts grid on the Spare Parts tab, first select the parts that you would like to order. Then click the Order/Requisition button. The following screen will then appear:
To create a new order select the Create new Order option and then select a supplier. To add the parts to an existing order, select the Add to Existing Order option and select the order to be modified. Then click the Ok button.
An order will then be either created or modified and then displayed. If you select one or more spare parts which are not associated with the selected supplier (or the supplier for the selected order) then those parts will not be added to the order.
PPM Schedules
It is now possible to specify an alternative frequency on a PPM Schedule which will be used when closing a missed PPM job. i.e. setting a scheduled PPM job to a status with a status class of “Missed PPM”.
Suppose that a device is maintained on a 3-yearly schedule and is due for maintenance on 1/1/2019. If the device cannot be found on that date then closing it as a missed PPM will schedule the next job for 1/1/2022. If you prefer you can specify that after a missed PPM the next job should be scheduled at a lower interval.
Using this schedule the next PPM job for this device would be scheduled for 1/1/2020.
Models
The Technical tab on the model property page has been enhanced to include maintenance profiles. See the earlier sections in this post to learn how model-specific maintenance profiles are used in the commissioning process.
A new field, Approved, has been added to the General tab of the model property page.
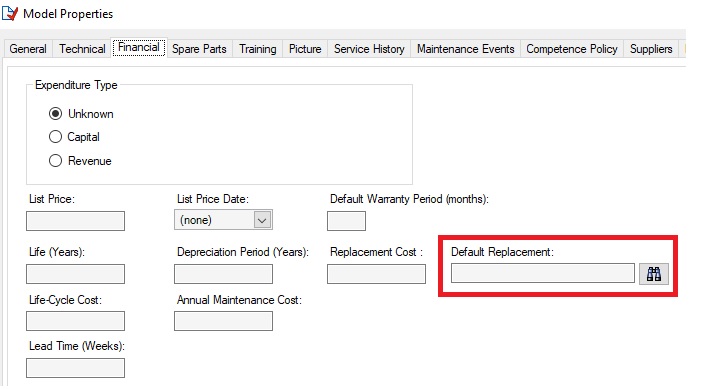
A new lookup, Default Replacement, has been added to the financial tab of the model property page. This value identifies the model which will, by default, be used as the replacement for devices of this type. It is used by the capital bidding mechanism.
Contracts
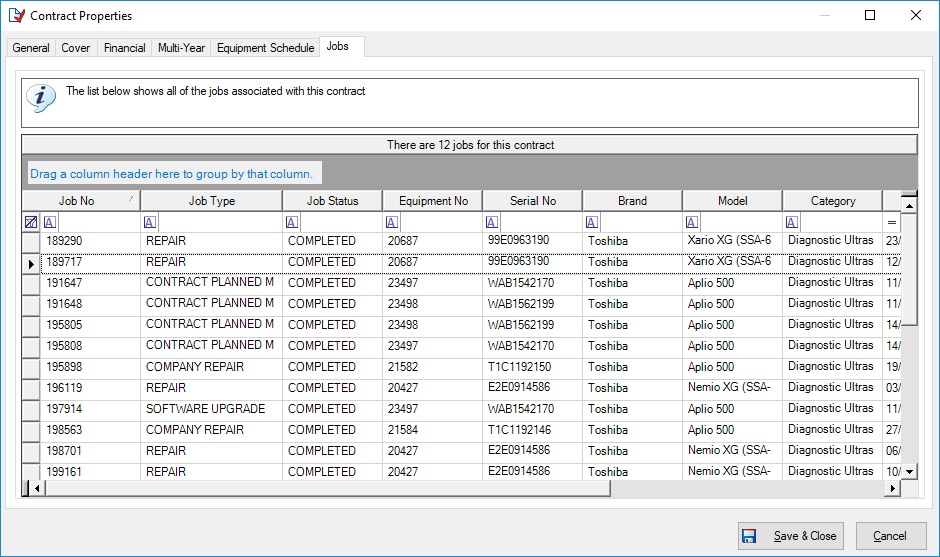
A new tab, Jobs, has been added to the contract property page.
The following fields have been added to the Coverage tab:
- Response Time (on-site)
- Includes Loan Item(s)
- Includes Upgrades
- Includes Consumables
- Includes Service Kits
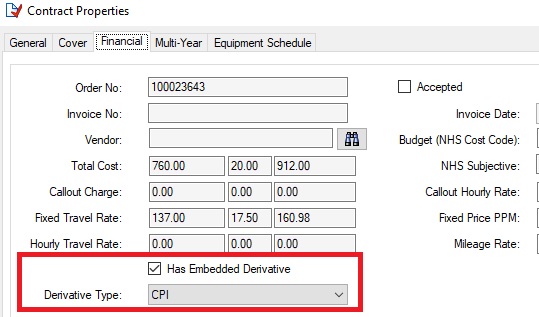
- Has Embedded Derivative
- Embedded Derivative Type
Embedded derivatives specify the mechanism used to increase periodically contract prices.
Spare Parts
A new field, Economic Order Quantity, has been added to the Ordering tab of the spare part property page.
Spare Part Locations (Bins)
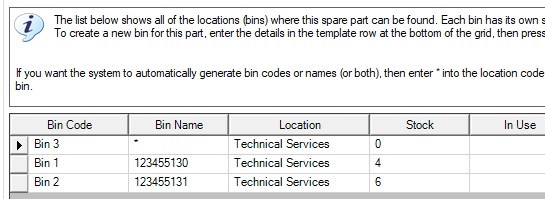
The spare part bins summary screen has been modified so that double-clicking on a single grid row will open the spare part property page for the part associated with the stock location. This allows the part and all of its locations to be viewed and edited.
While this new functionality may be useful there are some caveats arising from it. Suppose that a spare part has 3 bins (stock locations). These will appear as 3 separate rows in this screen.
If you double-click on the row for Bin 1 this will display the property page for the spare part “A SPARE PART”. This property page allows you to view and edit all of the locations (see below):
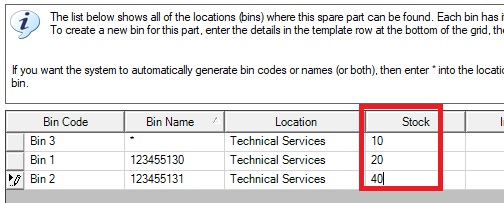
Because you have selected a single row in the grid, only that row will be refreshed if you make any changed via the property page. If your changes affect multiple rows then you must manually refresh those rows (by pressing F5). For example, if you were to edit the stock in each bin from the property page, then this would be the result:
Notice that only the stock for Bin 1 has been refreshed in the grid, i.e. the row which was double-clicked.
In this case you should refresh all rows by pressing F5.
Spare Part Import
The spare part import utility has been enhanced to allow import of:
- Team – part & bin
- Minimum Stock – part & bin
- Maximum Stock – part only
- Target Stock – bin only
- Markup %
- Supplier Ref
- Supplier Price
Locations
Two new read-only columns have been added to the location summary screen:
- GLNEPC
- Parent GLNEPC
These columns calculate and display the GS1 EPC (Electronic Product Code) of the location and parent location.
A new checkbox, Stock Location, has been added to the miscellaneous tab of the location property page. This indicates whether or not the location acts as a spare part store.
When defining spare part bins on the spare part property page, only locations with this flag set can be selected. Note that the upgrade process automatically sets this flag for all existing spare part locations.
PPQs/PAQs
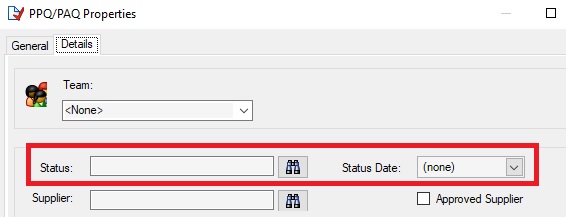
Two new fields have been added to the Miscellaneous tab of the PPQ/PAQ property page:
- Status
- Status Date
Documents
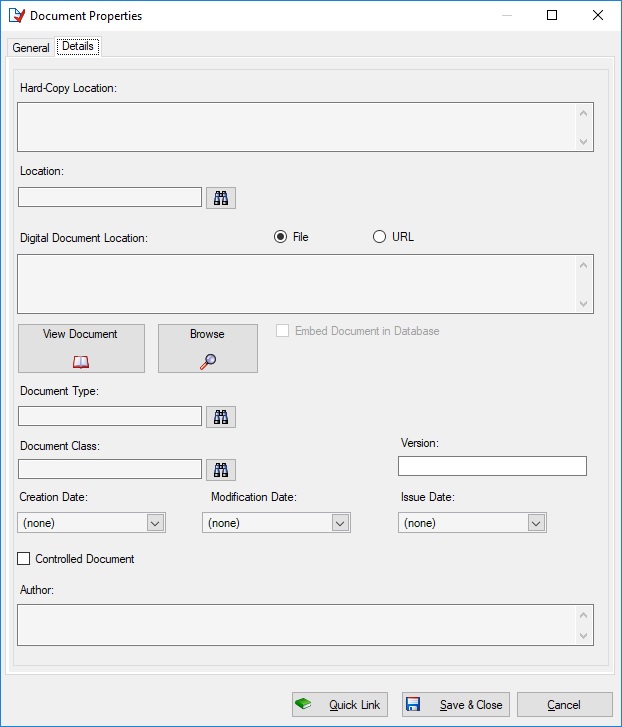
Two new fields, Version and Issue Date have been added to the Details tab of the document property page:
All Summary Screens
All summary screens now show an ellipsis (…) on the right-hand edge of columns which have been truncated to indicate that further text is present.
Note that the ellipsis only appears if the text wrap feature (F8) has not been enabled.
Multiple-Selection Lookups
Multiple-selection capability has been added to the following lookups:
- Job Test Equipment sub-list
- Job Spare Parts sub-list
- PPM Schedule Models sub-list
Importing Data
Aside from the improvements to the spare part import (see above), the equipment and personnel imports have also added support for additional fields.
Equipment Import:
- Takeon Date
- Delivery Date
- Handover Date
Personnel import:
- Professionally Registered
Reports
A data sheet report has been added for PPQs/PAQs
Audit Viewer
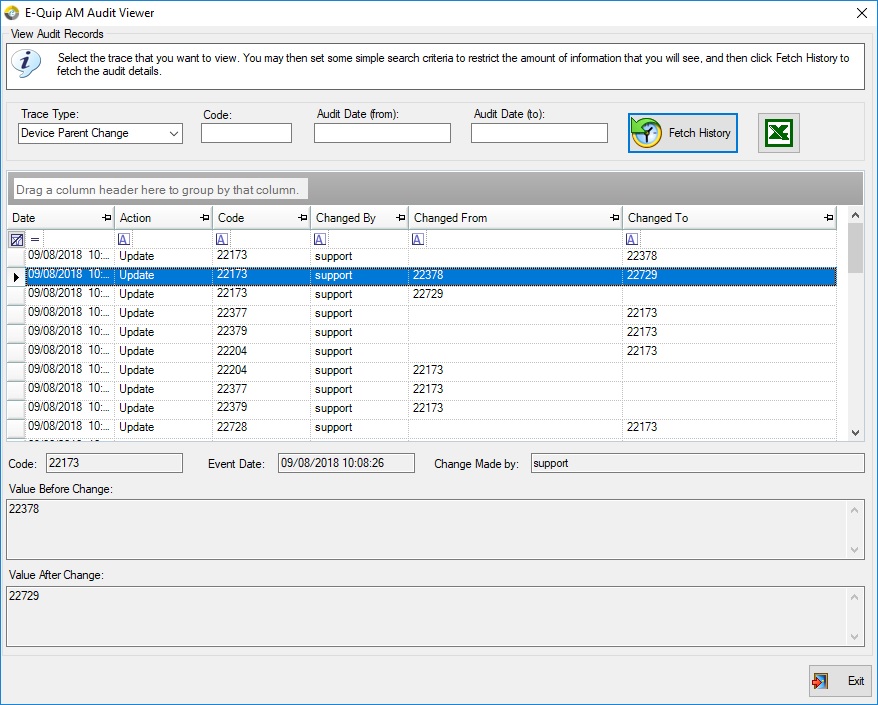
1. A new audit trace has been added to record whenever the parent of a device changes. These audit records are written automatically when an assembly is modified using the new System PPM / System Builder utility (see above).
Roles
It is now possible to specify a default loan type for a role
The Email button on the job property page can now be hidden on a per-role basis. Since the introduction of fully-automated emailing using SMTP, the use of this older utility is now deprecated. The same is true of the Email button on the Delivery property page.
Improved Security
e-Quip now uses AES 256 encryption for all passwords held either in the database or the Windows registry.
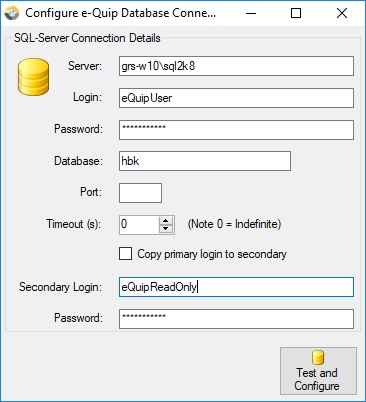
Also, in order to circumvent certain types of malicious attack, e-Quip is now able to optionally make use of a read-only SQL-Server connection for some internal operations. This is configured using the Select Database utility that you are probably familiar with:
Your administrator is not forced to make use of this feature, but it is strongly advised.
New Reference Data
The following new reference data types have been added:
- Capital Project Type
- Capital Project Status
- Capital Project Bid Type
- Capital Project Bid Status
- Capital Project Bid Priority
- Clinical Replacement Priority
- Embedded Derivative Type
- Depreciation Type
- Support Level Class
- PPQ/PAQ Status
A new Job Task Type Class has been added to support reporting on the last LOLER test date.
New System Options
The most significant new system options are:
- Disallow Document Embedding
- Use Job Locking
The former disables the embedded document feature for new documents while the latter enables pessimistic job locking.
Several other options have been added to meet the requests of specific users:
Prompt for Spare Parts: If this option is set, then whenever a job is completed, if the spare parts sub-list is empty then the user is asked to confirm that no spare parts were used.
Prompt for Test Equipment: If this option is set, then whenever a job is completed, if the test equipment sub-list is empty then the user is asked to confirm that no test equipment was used.
Copy Model List Price in Bulk Update: If this option is set, then whenever the equipment model is changed using bulk update the model list will be copied to the equipment unit price.
So, that’s version 4.0. We expect that it will be released to our beta-test sites within the next two weeks. It will be available for general release as soon as our beta-testers are happy with its stability.
As always, any feedback would be welcome, as would any last-minute requests.
